How to install Reaction Buttons in Blogger - Complete Guide with Pictures
How to Add Reaction Buttons in Blogger?
The most common idea why you want to add reaction button in your site is that Reaction buttons give your visitors a fun, quick way to interact with your content. That is also a big impact on your side knowing whether your visitors like or dislike your content. If you receive more like reactions then better continue what you are doing but if dislike then better change or improve more your content, as simple as that.

Let us begin with the tutorial, simply follow the steps below:
Step #1: Create an account at ShareThis.com
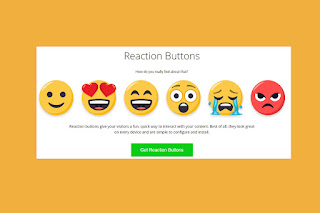
For this tutorial, We are going to use reaction buttons from sharethis platform. What are sharethis reaction buttons? ShareThis reaction buttons allow your site visitors to react to your content in a single click: Like it. Love it. Wow. LOL. Sad. Angry.
The beauty of reaction buttons is that they lower the barrier to interaction: Instead of having to comment, share, or choose any other form of interaction, your website visitors can provide instant feedback to any content – photos, blog posts, new site pages, video, etc. – with close to zero effort. And that’s your ticket to more interaction from more people.
Step #2: After Creating an Account, Log-in and You will be directed to ShareThis APP Directory.
Step #3: On the Upper Right, Click Drop Down Arrow and Select "Setup New Property.
Step #4: It will ask you to give the Name of your New Property Domain. Just simply type your blog URL then click "ADD".
Step #5: Now look for Engagement Tools and Choose Reaction Share Buttons.
Buttons Configuration:
Step #6: We are going to verify your domain by installing the sharethis.js code into your Blogger template.
Step #7: Go to your Blogger Dashboard --> Select Theme --> Edit HTML --> Paste the given code after <head>. . Once Done Click Verify.
Note: If you will encounter problem in saving regarding CMS in the code "product=inline-reaction-buttons&cms=sop" simply replace "&" from your script with "&". Code should be like this: "product=inline-reaction-buttons&cms=sop".
Step #8: Copy and Paste the next code where you want to show reaction buttons.
To Show Reaction Buttons Below Posts:
If you want to show reaction buttons below your posts then copy below code and paste it above <div class='post-footer'> in your theme code.
Note: You will find <div class='post-footer'> two times in your theme paste the above code above second <div class='post-footer'>.
Step #9: Click Save and your done.
If you want to update your Reaction Buttons simply make all the updates at your Sharethis APP dashboard.
That's all for this tutorial. Feel free to comment below if you have any questions or suggestions. If you like this post kindly share and even share us a beer!
Happy Blogging!
Learn more »
The most common idea why you want to add reaction button in your site is that Reaction buttons give your visitors a fun, quick way to interact with your content. That is also a big impact on your side knowing whether your visitors like or dislike your content. If you receive more like reactions then better continue what you are doing but if dislike then better change or improve more your content, as simple as that.

Let us begin with the tutorial, simply follow the steps below:
Step #1: Create an account at ShareThis.com
For this tutorial, We are going to use reaction buttons from sharethis platform. What are sharethis reaction buttons? ShareThis reaction buttons allow your site visitors to react to your content in a single click: Like it. Love it. Wow. LOL. Sad. Angry.
The beauty of reaction buttons is that they lower the barrier to interaction: Instead of having to comment, share, or choose any other form of interaction, your website visitors can provide instant feedback to any content – photos, blog posts, new site pages, video, etc. – with close to zero effort. And that’s your ticket to more interaction from more people.
Step #2: After Creating an Account, Log-in and You will be directed to ShareThis APP Directory.
Step #3: On the Upper Right, Click Drop Down Arrow and Select "Setup New Property.
Step #4: It will ask you to give the Name of your New Property Domain. Just simply type your blog URL then click "ADD".
Step #5: Now look for Engagement Tools and Choose Reaction Share Buttons.
Buttons Configuration:
- Click a reaction to add or remove it from your buttons
- Click and drag a reaction to reorder
- Choose left, center, or right alignment
- Choose your language
Step #6: We are going to verify your domain by installing the sharethis.js code into your Blogger template.
Step #7: Go to your Blogger Dashboard --> Select Theme --> Edit HTML --> Paste the given code after <head>. . Once Done Click Verify.
Note: If you will encounter problem in saving regarding CMS in the code "product=inline-reaction-buttons&cms=sop" simply replace "&" from your script with "&". Code should be like this: "product=inline-reaction-buttons&cms=sop".
Step #8: Copy and Paste the next code where you want to show reaction buttons.
To Show Reaction Buttons Below Posts:
If you want to show reaction buttons below your posts then copy below code and paste it above <div class='post-footer'> in your theme code.
<b:if cond='data:blog.pageType == "item"'>
<div class="sharethis-inline-reaction-buttons"></div>
</b:if>
Note: You will find <div class='post-footer'> two times in your theme paste the above code above second <div class='post-footer'>.
If you want to update your Reaction Buttons simply make all the updates at your Sharethis APP dashboard.
That's all for this tutorial. Feel free to comment below if you have any questions or suggestions. If you like this post kindly share and even share us a beer!
Happy Blogging!


