Featured

Disable text selection in blogger Excluding Blockqoute and Precode

Content writing takes every blogger a hard time from research down to posting it in their blog/website. But nowadays many new blogger simply doesn't want to do any research or to even write their own content, what they do is simply copy and paste other bloggers article. Which is of course a no no since copied content can now be penalized and when they try to apply for any monetization platform they will be disapprove especially when they will be applying for Google Adsense.

Disable text selection in blogger Excluding Blockqoute and Precode

This is actually the reason why most blogger disable the text selection in their site. Now for this tutorial, you are going to learn How to disable text selection in Blogger excluding Blockqoute and Precode. We exclude Blockqoute and Precode because if your blog is about giving tutorials then it is expected that you will be sharing code and of course your visitors will get irritated if even the code you are sharing cannot be copied.

To begin with the tutorial, simply follow the steps below:


Step #1: Log in to your Blogger Account and Go to your Blogger Dashboard.

Step #2: Click Template --> Edit HTML.

Step #3: Find ]]></b:skin> by Pressing CTRL + F (Windows) or CMD + F (MAC)

Step #4: Now paste the below code above/before ]]></b:skin>

.post-body {
 -webkit-user-select : none ;
 -khtml-user-select : none ;
 -moz-user-select : none ;
 -ms-user-select : none ;
 user-select : none ;
}

This code will prevent the reader to select any text on your blog post including Blockqoute and Precode.

To allow the readers to copy the code inside your blockqoute and Precode, follow the step below.

Step #5: Paste the below code above/before ]]></b:skin>  and Save your template.

Blockqoute:

post-body blockquote {
 -webkit-user-select : text ;
 -khtml-user-select : text ;
 -moz-user-select : text ;
 -ms-user-select : text ;
 user-select : text ;
}

Precode:

pre {
 -webkit-user-select : text ;
 -khtml-user-select : text ;
 -moz-user-select : text ;
 -ms-user-select : text ;
 user-select : text ;
}

That's it for this tutorial. Happy Blogging!
Learn more »

How to Embed Instagram Videos in Blogger Post?

Instagram (also known as IG or Insta) is a photo and video-sharing social networking service owned by Facebook, Inc. It was created by Kevin Systrom and Mike Krieger, and launched in October 2010 exclusively on iOS. That is for a little background.

How to Embed Instagram Videos in Blogger Post?


For this article, you are going to learn how to embed Instagram videos in blogger post. I include this tutorial here in vbt, since vblogger-templates (vbt) focuses more on video blog and It might come in handy for everyone.

There are actually different Methods to embed Instagram videos in Blogger post. For this tutorial we are going to have the 3 best ways to do it. Let start and simply follow the steps below.


Method 1: Adding Instagram Videos by using embed.ly


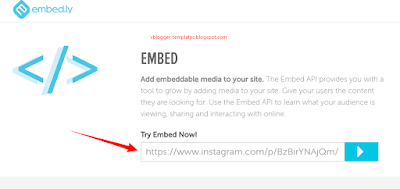
Step #1: Visit http://embed.ly/.

Step #2: Go to Product Select Embed Anything to your site.

Step #3: Paste your Instagram video URL and Click Try It.

How to Embed Instagram Videos in Blogger Post?

Step #4: Copy the "Embed code"


Step #5: Go to Blogger --> Add New Post --> HTML section and Paste the code.

That's it for the first method.

Method 2: Adding Instagram Videos by ctrlq.org


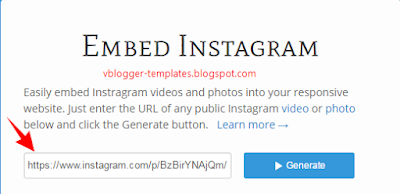
Step #1: Visit http://ctrlq.org/instagram/.

Step #2: Paste your Instagram video URL and Click Generate.

How to Embed Instagram Videos in Blogger Post?

Step #3: Copy the "Embed code"


Step #4: Go to Blogger --> Add New Post --> HTML section and Paste the code.

That's it for the second method.


Method 3: Adding Instagram Videos by changing the URL's


Step #1: Copy the URL of your chosen Instagram Video.

Step #2: At the END of that URL simply add /embed.

Example: https://www.instagram.com/p/BzBirYNAjQm

Output: https://www.instagram.com/p/BzBirYNAjQm/embed

Step #3: After editing the URL use the iframe below and include your edited URL as shown below.

<iframe frameborder='0' height='292'src='https://www.instagram.com/p/BzBirYNAjQm/embed?byline=0&amp;portrait=0' width='417px'/>


Step #4: Go to Blogger --> Add New Post --> HTML section and Paste the code.

That's it for the third method.

Well if you have any questions regarding this article feel free to comment and I will assist you all the way. Goodluck and Happy Blogging everyone!

Learn more »

How to Integrate Facebook Messenger in Blogger?

If you got any questions or inquiry with the admin of the blog you visited, you always find the contact page. Whether you will send your inquiry thru email or any other forms of communication.

Now one of the feature apps of Facebook is the messenger, basically this apps is used for communication. With this apps you can directly contact anyone from your friend lists in Facebook. Messenger is such a great tool for communication and we are going to integrate this in blogger so that visitors if they want to can directly send message to the Blog Admin.

This is how we are going to integrate this apps to your blogger site.

How to Integrate Facebook Messenger in Blogger?


To begin with our tutorial, simply follow the steps below.


Step #1: Log in to your Blogger Account and Go to your Blogger Dashboard.

Step #2: Go to Blogger Layout section.

Step #3: Click on Add Gadget and select HTML/Javascript gadget.

Step #4: Leave the title blank and Paste the below code into the HTML/Javascript gadget.

Note: Add the code including the CONTINUATION code below together as one.


<style type="text/css">#b-c-facebook .fbchat_box,#chat_f_b_smal,#f_bt_start_chat{background:#3a5897}#fbchat_box{padding-right:15px;max-width:210px;max-height:50px;display:block;transition:all .3s}#b-c-facebook .f-chat-conent .chat-single a,#chat_f_b_smal{font-family:Arial,sans-serif}#b-c-facebook .fbchat_box,#chat_f_b_smal{text-shadow:0 1px 0 rgba(0,0,0,.1);background-repeat:repeat-x;background-size:auto;background-position:0 0;text-decoration:none}.chat_f_vt{position:fixed;right:10px}#chat_f_b_smal{padding:0 10px;cursor:pointer;width:90px;color:#fff;height:38px;line-height:38px;background-color:#3a5897;border:0;margin-right:12px;font-size:14px;z-index:999999999;bottom:0;border-top-left-radius:5px;border-top-right-radius:5px;bottom:-400px;transition:all .3s;text-align:center;display:block}#chat_f_b_smal:hover{background-color:#3B5998;opacity:1}#b-c-facebook{margin-right:50px;bottom:0;z-index:9999999999;transition:all .3s;width:250px;height:auto;max-height:375px;min-height:38px;box-shadow:0 10px 50px 0 rgba(0,0,0,0.25);border-top-left-radius:5px;border-top-right-radius:5px;overflow:hidden;display:block}#b-c-facebook .f-chat-conent{float:left;width:100%;height:335px;overflow:hidden;display:none;background-color:#fff;position:relative}#b-c-facebook .f-chat-conent .chat-single{float:left;position:absolute;bottom:0;left:0;background-color:#fff;line-height:25px;color:#fff;width:100%}#b-c-facebook .f-chat-conent .chat-single a{float:left;text-decoration:none;margin-left:10px;color:#0C5BB5;font-size:12px}#b-c-facebook .f-chat-conent .chat-single a:hover{color:#F60}#b-c-facebook .fbchat_box label{width:185px}#b-c-facebook .f-chat-conent .chat-single label{float:right;color:silver;margin-right:5px;font-size:12px;font-family:Arial}#b-c-facebook .fbchat_box,#b-c-facebook .fbchat_box label{line-height:20px;margin:0;cursor:pointer;font-family:Arial,sans-serif;font-size:14px}#b-c-facebook .f-chat-conent .chat-single i{color:#0C5BB5}#b-c-facebook .f-chat-conent .fb-page{margin-top:0;float:left;height:310px}#b-c-facebook .fbchat_box{float:left;padding:0 25px;padding-left:15px;width:250px;color:#fff;height:38px;line-height:38px;background-color:#3a5897;border:0;z-index:9999999;margin-right:12px}#b-c-facebook .fbchat_box label{position:absolute;top:10px}//Widget by www.bloggerspice.com .title-f-chat-icon{margin-left:-10px}#t_f_chat{float:left;position:absolute;right:15px;top:-5px}#t_f_chat a{color:#fff;font-size:17px;font-family:verdana;text-decoration:none}#t_f_chat a:hover i{color:#ff0;text-decoration:none}.chat-left-5{margin-left:2px}#start_chat{position:absolute;width:248px;height:239px;top:70px;left:0;background-color:#fff;padding:10px;float:left;display:none}#start_chat em{font-size:11px;color:gray}.msg_b{color:#434a54;width:80%;word-wrap:break-word;overflow:hidden;font-family:Arial,sans-serif;font-size:14px;background:#edeef1;padding:10px;min-height:13px;margin-bottom:5px;position:relative;margin:5px;border-radius:5px;border:1px solid #dfe3e9}#close_chat{opacity:0.5}#close_chat:hover{opacity:1}.msg_b a{text-decoration:underline;color:#01509E}#f_bt_start_chat{margin:auto;background-color:#3a5897;border-radius:3px;color:#fff;font-family:Arial;font-size:14px;font-weight:bold;padding:9px 35px;text-decoration:none}#f_bt_start_chat:hover{text-decoration:none;opacity:0.8}#start_chat p{margin-top:30px}#fb_alert_num{background-color:#ff0;padding:0 7px;color:red;border-radius:40px;font-size:13px;font-family:Arial;font-weight:700;position:absolute;right:55px;top:12px;height:20px;line-height:20px;display:none!important}.hide_chatbox{display:none}#f_enter_3{margin-top:30px}</style>

Continuation Code:

<script>//<![CDATA[function check_fist_vist_f(){var _=f_read_cki("check_fist_vist_f");(0==_||""==_)&&(fb_eshow("f-chat-conent"),f_create_cki("check_fist_vist_f","1",1),f_create_cki("f_chat_open","1",1))}function close_chat(){fb_ehide('b-c-facebook'),f_create_cki('close_chat',1,1),$('body').find('.zopim').remove(),fb_eshow('chat_f_b_smal'),on_playsound('click')}function open_chat(){f_create_cki('close_chat','0',1),fb_eshow('b-c-facebook'),fb_eshow('f-chat-conent'),fb_ehide('chat_f_b_smal')}function f_bt_start_chat(){f_create_cki('f_bt_start_chat','1',10),fb_ehide('start_chat'),fb_ehide('fb_alert_num'),on_playsound('click')}function f_c_start_chat(){var t=f_read_cki('f_bt_start_chat');0==t||''==t?(fb_eshow('start_chat '),fb_eshow('fb_alert_num'),f_chat_step()):(fb_ehide('start_chat'),fb_ehide('fb_alert_num'))}function b_f_chat(){var t=f_read_cki('f_chat_open');0==t||''==t?(fb_eshow('f-chat-conent'),f_create_cki('f_chat_open','1',1)):(fb_ehide('f-chat-conent'),f_create_cki('f_chat_open','0',1)),on_playsound('click')}function f_ck_chat(){check_fist_vist_f();f_c_start_chat();var t=f_read_cki('close_chat');if(''==t||0==t||'0'==t){fb_eshow('b-c-facebook'),fb_ehide('chat_f_b_smal');var e=f_read_cki('f_chat_open');(1==e||'1'==e)&&fb_eshow('f-chat-conent')}else fb_eshow('chat_f_b_smal'),fb_ehide('b-c-facebook')}function f_chat_step(){on_playsound('door_bell')fb_eshow('f_enter_1');fb_eshow('f_enter_3');}function fb_eshow(t){document.getElementById(t).style.display='block';}function fb_ehide(t){document.getElementById(t).style.display='none';}function f_create_cki(t,e,n){if(n){var o=new Date;o.setTime(o.getTime()+24*n*60*60*1e3);var c='; expires='+o.toGMTString()}else var c='';document.cookie=t+'='+e+c+'; path=/';}function f_read_cki(t){for(var e=t+'=',n=document.cookie.split(';'),o=0;o<n.length;o++){for(var c=n[o];' '==c.charAt(0);)c=c.substring(1,c.length);if(0==c.indexOf(e))return c.substring(e.length,c.length)}return''}function on_playsound(t){}function ionSound(){1==web_sound&&$.ionSound({sounds:['click','door_bell'],path:fb_path.live_chat_path+'sounds/',multiPlay:!0,volume:'1.0'})}var web_sound=!0;jQuery(document).ready(function(t){t(window).scroll(function(){var e=t(window).width();680>=e?f_create_cki('f_chat_open','0',1):f_create_cki('f_chat_open','1',1)})}),setTimeout(function(){f_ck_chat()},1000);var $=jQuery.noConflict();!function(t){if(!t.ionSound){var e,n,o,c,_={},f={},a=!1,i=function(e){var c,a;-1!==e.indexOf(':')?(c=e.split(':')[0],a=e.split(':')[1]):c=e,f[c]=new Audio,n=f[c].canPlayType('audio/mp3'),o='probably'===n||'maybe'===n?_.path+c+'.mp3':_.path+c+'.ogg',t(f[c]).prop('src',o),f[c].load(),f[c].preload='auto',f[c].volume=a||_.volume},u=function(t){var e,n,o,c;if(-1!==t.indexOf(':')?(n=t.split(':')[0],o=t.split(':')[1]):n=t,e=f[n],'object'==typeof e&&null!==e)if(o&&(e.volume=o),_.multiPlay||a){if(_.multiPlay)if(e.ended)e.play();else{try{e.currentTime=0}catch(i){}e.play()}}else e.play(),a=!0,c=setInterval(function(){e.ended&&(clearInterval(c),a=!1)},250)},l=function(t){var e=f[t];if('object'==typeof e&&null!==e){e.pause();try{e.currentTime=0}catch(n){}}},r=function(t){var e=f[t];if('object'==typeof e&&null!==e){try{f[t].src=''}catch(n){}f[t]=null}};t.ionSound=function(n){if(_=t.extend({sounds:['water_droplet'],path:'/sounds/',multiPlay:!0,volume:'0.5'},n),e=_.sounds.length,'function'==typeof Audio||'object'==typeof Audio)for(c=0;e>c;c+=1)i(_.sounds[c]);t.ionSound.play=function(t){u(t)},t.ionSound.stop=function(t){l(t)},t.ionSound.kill=function(t){r(t)}},t.ionSound.destroy=function(){for(c=0;e>c;c+=1)f[_.sounds[c]]=null;e=0,t.ionSound.play=function(){},t.ionSound.stop=function(){},t.ionSound.kill=function(){}}}}(jQuery);//]]></script><a title="Open Chat" id="chat_f_b_smal" onclick="open_chat()" class="chat_f_vt">Open Chat</a> <div id="b-c-facebook" class="chat_f_vt"> <div id="fbchat_box" onclick="b_f_chat()" class="fbchat_box"> <label>Send Message to Admin</label> <span id="fb_alert_num">1</span> <div id="t_f_chat"><div class='close_chatfb' onclick='hidechatfb()'>&#95;</div></div></div><div id="f-chat-conent" class="f-chat-conent"> <div class="fb-page" data-tabs="messages" data-href="https://www.facebook.com/romebros/" data-width="250" data-height="310" data-small-header="true" data-adapt-container-width="true" data-hide-cover="true" data-show-facepile="false" data-show-posts="true"> </div><div id="start_chat"> <div id="f_enter_1" class="msg_b hide_chatbox"> Hello! Thanks for visiting my site. Please press Start button to Contact with Admin :) </div><p id="f_enter_3" class="hide_chatbox" align="center"> <a href="javascript:;" onclick="f_bt_start_chat()" id="f_bt_start_chat">Start</a> </p></div></div></div><div id="fb-root"></div><script>(function(d,s,id){var js,fjs=d.getElementsByTagName(s)[0];if(d.getElementById(id))return;js=d.createElement(s);js.id=id;js.src="//connect.facebook.net/en_US/sdk.js#xfbml=1&version=v2.5";fjs.parentNode.insertBefore(js,fjs);}(document,'script','facebook-jssdk'));</script>


Editing: Locate https://www.facebook.com/romebros and change "romebros" on your own Facebook page username.

Step #5: Now hit Save Button and Press the Save Arrangement button from the top.

Head over to your blog and see the result. 

That's it for this tutorials.. Happy Blogging!
Learn more »

How to make Blog Post Image Responsive?

Today's trend in blogging is how to make your templates responsive, that it can adapt in any kinds of devices e.g. PC, Laptop, mobile, tables etc. This is also a challenge  on the part of every website/blog administrator.

There are instances that yes your templates is responsive but when your posting image/photos it display larger and some would even go out of the blog post body when seen in other devices.

Now to solve this issue, we have to make your image post responsive.

How to make Blog Post Image Responsive?


Just simply follow the steps below:

Step #1: Log in to your Blogger Account and Go to your Blogger Dashboard

Step #2: Click ->Template -> Edit HTML

Step #3: Find ]]></b:skin> by Pressing CTRL + F (Windows) or CMD + F (MAC)

Step #4: Now paste the below code above/before ]]></b:skin>


.post-body img {
  max-width:100%;
  height:auto;
}

Step #5: Now hit Save Template

The code width is define 100%, this means that image will be the same width according to your blog post width while the height is set auto.

That's all for this tutorials. To all visitors thank you for dropping by at vbt blog.

Happy Blogging!
Learn more »

How to add Spinning effect on Logo and Title?

Logo for a website or blog usually is a for branding purposes. It can give visitor/s the idea of what kind of website you have. Having fancy logo would also attract visitors to your site. Now for this tutorial, We will be showing you how to add spinning effect on your logo when mouse over.

This is such an amazing tricks since you are giving your logo an amazing effect that even your visitors can play around.

Let's start with the tutorial.

How to add Spinning effect on Logo and Title?


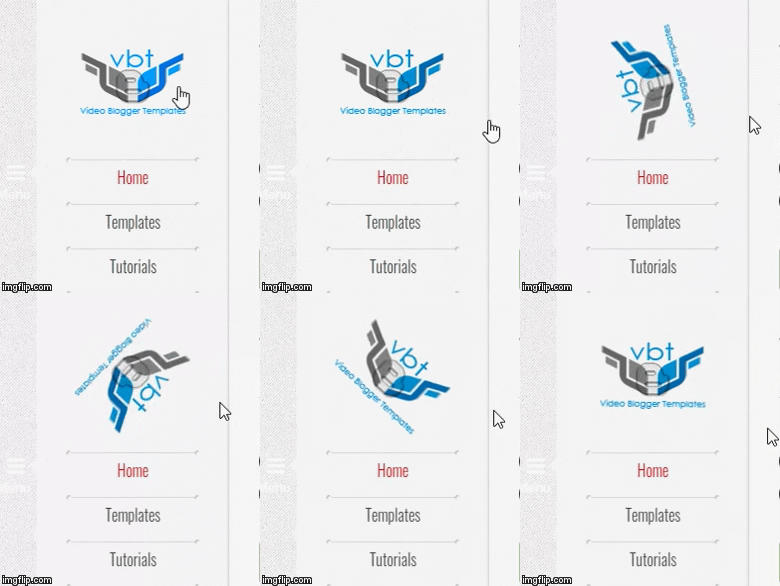
Demo: Mouse over VBT logo or see GIF below


Follow the steps below:

Step #1: Log in to your Blogger Account and Go to your Blogger Dashboard

Step #2: Click ->Template -> Edit HTML

Step #3: Find ]]></b:skin> by Pressing CTRL + F (Windows) or CMD + F (MAC)

Step #4: Now paste the below code above/before ]]></b:skin>


#header-inner{
 -moz-transition: all 0.8s ease-in-out;
    -webkit-transition: all 0.8s ease-in-out;
    -o-transition: all 0.8s ease-in-out;
    -ms-transition: all 0.8s ease-in-out;
    transition: all 0.8s ease-in-out;
}
#header-inner:hover{
-moz-transform: rotate(360deg);
    -webkit-transform: rotate(360deg);
    -o-transform: rotate(360deg);
    -ms-transform: rotate(360deg);
    transform: rotate(360deg);
}

Step #5: Now hit Save Template

Now head over to your blog site, mouse over to your logo and see that your logo is spinning.

That's all for this tutorials. To all visitors thank you for dropping by at vbt blog.

Happy Blogging!
Learn more »

Tutorial: One Click to Select Code Inside Blockqoute in Blogger

Sharing post in Blogger mostly required the use of blockqoute. Blockqoute highlight the text or code that you want to emphasize to your reader. If your into giving Blogging Tutorials, then blockqoute is often use to display your code within tag. The advantages is it will be easy for your visitor/s to copy the code, all code will be select instantly and less hassle in copying especially when there are bunch of code.

Tutorial: One Click to Select Code Inside Blockqoute in Blogger

Now this tutorial, "One Click to Select Code Inside Blockqoute in Blogger" will be a great help to your visitor/s. Let's proceed in installing this feature in your blog.

Demo

This is a demo page for this tutorial: One Click to Select Code inside "Blockqoute" in Blogger.
Just simply do "one click" inside this blockqoute and all this text will be selected.
Thank you!


Follow the steps below:

Step #1: Log in to your Blogger Account and Go to your Blogger Dashboard

Step #2: Click ->Template -> Edit HTML
Step #3: Find  </body> by Pressing CTRL + F (Windows) or CMD + F (MAC)

Step #4: Copy the code below and Paste it above/before </body>

<script type='text/javascript'>
var pres = document.getElementsByTagName(&quot;blockquote&quot;);
for (var i = 0; i &lt; pres.length; i++) {
pres[i].addEventListener(&quot;click&quot;, function () {
var selection = getSelection();
var range = document.createRange();
range.selectNodeContents(this);
selection.removeAllRanges();
selection.addRange(range);
 }, false);
}
</script>

Step #5: Save your Template

Customization:

- If you want to use double click simply change click to dblclick.


That's all for this tutorial. Check your blog to see it live.
Learn more »

How to Add Logo to Blogger Header

Introduction

In this tutorial,you are going to learn the basic thing on how to add a logo to Blogger Header.

How to Add Logo to Blogger Header

Logo is one of the important aspect that you need to consider when making a blog or website. Simply because a logo is the visual representation of your blog or website. Actually based from your logo visitors would already identify the type of blog or website you have.

Adding logo to your site header is very simple. Just simply follow the steps below.


How to Add Logo to Blogger header.

Steps to follow:

1. On your Dashboard, Click on "Edit" link of your header widget.

How to Add Logo to Blogger Header

Note: a new window will open.

2. There are 2 ways to add your header logo image.

A. From your computer - using this option you can upload a logo image from your hard disk.

B. From the web - using this option you can give logo image URL to the input field has given. (If you already have uploaded it to somewhere)

I recommend to continue with "From your computer" option, because uploading your logo to blogger, it will load fast.

How to Add Logo to Blogger Header

Select "Instead of title and description" as the "Placement" option.

3. Select logo image from your hard drive.


4. When upload complete, Save Header widget and refresh your site to see result. 


Final results will be similar to below:

How to Add Logo to Blogger Header


Thats all, Thank you and  Happy Blogging!
Learn more »

How to install Blogger template

Introduction: 

Installing blogger templates on your blog is very easy. There are actually two ways to install, the first one is by uploading the actual XML format of blogger template and the second one is Copy and Paste coding. Completely replaced all coding.

In this tutorial where are going to do the uploading of XML. Take note that in Blogger the template is in XML format.

Ofcourse one thing that you need to prepare before installing Blogger templates is your downloaded blogger template. If your fun on video blogger templates then go ahead and head over to the homepage of this blog and look for the video template that sooths your taste of blog. If you want to use other template then just google it and there's a lot of website that offers free blogger templates.

Let say you have downloaded your template and with the XML on it. We are going with the installation of templates.


Step 1: Logged in your Blogger Dashboard. 

You must logged in your google account to access your blogger dashboard (Ignore this step if you are already logged in)


Step 2: Access Theme Section.

If you have multiple blogs, Just simply choose the Blog that you want to change the template and click “Theme” in the option panel on the left.


Step 3: Access Backup / Restore.

At the top right corner, you will see “Backup / Restore” button and go ahead click it on. 
Note: Before anything goes wrong, So that you can RESTORE the previous template always do a "BACKUP". Backup means simply download your old template before installing new one. 


Step 4: Get ready to upload. 

Manage on pop-up windows and click “choose file” button and look for folder that is created after extracted file that you have downloaded.


Step 5: Select .xml file for uploading.


Look for the downloaded XML file in the folder where you copy/extract/save  your blogger template.


Step 6: Start uploading template.

Click “Upload” button. Now uploading process appear in your screen.


A message will appear stating "Uploaded Successfully". Now the template will appear in your blog.


That's all. Goodluck!
Learn more »