How to install Push Notification in Blogger using OneSignal Platform
We have great collection of amazing looking video theme, You can download any theme you like for free. By using these themes, your blog is with an extraordinary feel of professionalism and style. Meanwhile continue reading How to install Push Notification in Blogger using OneSignal Platform.
Read Also!
Why use Push Notification in your site? Use push notification to message your users when they might need a reminder about something. People find great value in receiving push notifications that alert them of updates or the latest news from your blog.
One of the best and reliable platform for push notification is OneSignal. OneSignal is a reliable service to send push notifications, in-app messages, and emails to your users on mobile and web, including content management platforms like blogger, Wordpress and Shopify.
What is the advantage in using OneSignal? In OneSignal documentation you can discover resources and training to implement OneSignal’s SDKs, learn how to leverage OneSignal’s powerful API, and find best practices for sending messages to increase your user engagement. In short OneSignal is user friendly and easy to integrate to your website or blog.
Now let us proceed with the tutorial on how to setup OneSignal in blogger site. Simply follow the instructions and you will not get lost. If you have any questions feel free to comment below.
How to set up OneSignal Web Push notifications on Blogger sites
Configuring Notification at OneSignal.
Step #1: Create an account at OneSignal.Com > Proceed to Create New App/Website.
Step #2: Fill-up the name of your app or website > Select Web Push > Click Configure your platform
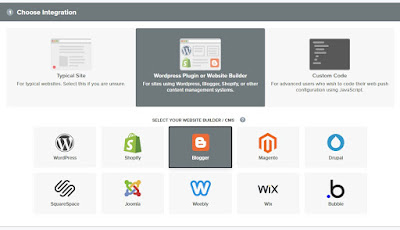
Step #3: Choose Integration
Note: OneSignal supports sending web push notifications from a variety of different web technologies. Select Blogger to continue
Step #4: Blogger Site Setup
Once you've selected Blogger as your integration, you must fill out information about your site.
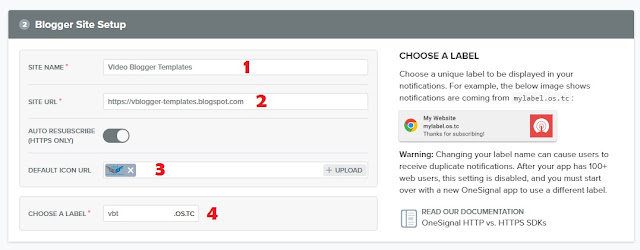
Choose a Label
Blogger implementations must choose a unique label to be displayed in your notifications. For example, the above image shows notifications are coming from vbt.os.tc. I use vbt as my label.
Note: You can only change your label if you have less than 100 web users. Once you have 100+ web users, this setting is disabled.
Step #5: Permission Prompt Setup
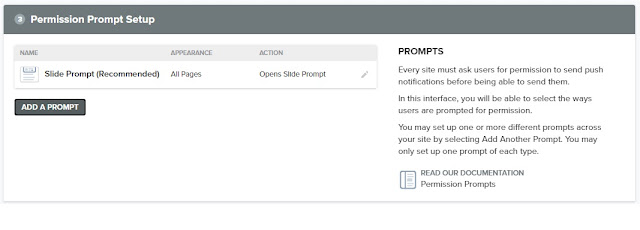
To send push notifications to users, you first must ask them for permission using a Prompt. You must have at least one Prompt on your site for web push to work. Click Add a Prompt to open the permission prompt selector.
Permission Prompt Editor
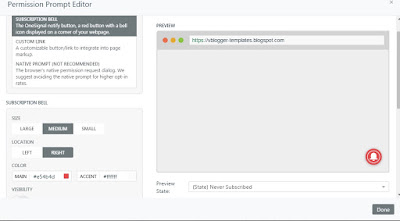
In the Permission Prompt Editor, you can select which prompts you wish to use, and style them as you like. Once you have edited the prompt to your liking, click Save.
The following Options can be see at the Permission Prompt Editor:
Subscription Bell - a small icon at the corner of your page that users can interact with to subscribe
Slide Prompt - a small modal that comes from the center of the page and asks if users are interested in signing up.
HTTP Pop-Up Prompt (HTTP-only) - a pop-up window that appears after other prompts that is required for HTTP sites.
Custom Prompts - create your own links or buttons as prompts.
Step #6: Welcome Notification
Optional
Welcome notifications an optional way to thank users after subscribing to your site. Users will see a welcome notification as soon as they subscribe. You can edit or disable them here.
Step #7: Advanced Options
Optional
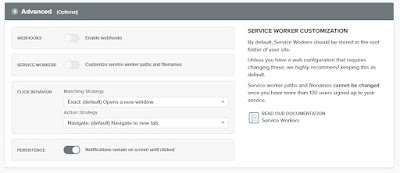
Most sites will not have to edit anything in Advanced options.
Step #8: Once you've completed steps 3-7, click 'Save' to save your configuration.
To enable OneSignal on your Blogger site, you will need to copy the code from Web Push Settings.
Adding Code to Blogger Site
Just simply follow the steps below:
Step #1: Log in to your Blogger Account and Go to your Blogger Dashboard
Step #2: Click ->Template -> Edit HTML Note: Backup your Template
Step #3: Find by Pressing CTRL + F (Windows) or CMD + F (MAC)
Step #4: Paste the code below tag.
Step #5: Save your template and you're done
Tutorial Credit: onesignal.com
That's all for this tutorials. Thanks for dropping by at vbt blog.
Happy Blogging!
One of the best and reliable platform for push notification is OneSignal. OneSignal is a reliable service to send push notifications, in-app messages, and emails to your users on mobile and web, including content management platforms like blogger, Wordpress and Shopify.
What is the advantage in using OneSignal? In OneSignal documentation you can discover resources and training to implement OneSignal’s SDKs, learn how to leverage OneSignal’s powerful API, and find best practices for sending messages to increase your user engagement. In short OneSignal is user friendly and easy to integrate to your website or blog.
Now let us proceed with the tutorial on how to setup OneSignal in blogger site. Simply follow the instructions and you will not get lost. If you have any questions feel free to comment below.
How to set up OneSignal Web Push notifications on Blogger sites
Configuring Notification at OneSignal.
Step #1: Create an account at OneSignal.Com > Proceed to Create New App/Website.
Step #2: Fill-up the name of your app or website > Select Web Push > Click Configure your platform
Step #3: Choose Integration
Note: OneSignal supports sending web push notifications from a variety of different web technologies. Select Blogger to continue
Step #4: Blogger Site Setup
Once you've selected Blogger as your integration, you must fill out information about your site.

Choose a Label
Blogger implementations must choose a unique label to be displayed in your notifications. For example, the above image shows notifications are coming from vbt.os.tc. I use vbt as my label.
Note: You can only change your label if you have less than 100 web users. Once you have 100+ web users, this setting is disabled.
Step #5: Permission Prompt Setup
To send push notifications to users, you first must ask them for permission using a Prompt. You must have at least one Prompt on your site for web push to work. Click Add a Prompt to open the permission prompt selector.
Permission Prompt Editor
In the Permission Prompt Editor, you can select which prompts you wish to use, and style them as you like. Once you have edited the prompt to your liking, click Save.
The following Options can be see at the Permission Prompt Editor:
Subscription Bell - a small icon at the corner of your page that users can interact with to subscribe
Slide Prompt - a small modal that comes from the center of the page and asks if users are interested in signing up.
HTTP Pop-Up Prompt (HTTP-only) - a pop-up window that appears after other prompts that is required for HTTP sites.
Custom Prompts - create your own links or buttons as prompts.
Step #6: Welcome Notification
Optional
Welcome notifications an optional way to thank users after subscribing to your site. Users will see a welcome notification as soon as they subscribe. You can edit or disable them here.
Step #7: Advanced Options
Optional
Most sites will not have to edit anything in Advanced options.
Step #8: Once you've completed steps 3-7, click 'Save' to save your configuration.
To enable OneSignal on your Blogger site, you will need to copy the code from Web Push Settings.
Adding Code to Blogger Site
Just simply follow the steps below:
Step #1: Log in to your Blogger Account and Go to your Blogger Dashboard
Step #2: Click ->Template -> Edit HTML Note: Backup your Template
Step #3: Find by Pressing CTRL + F (Windows) or CMD + F (MAC)
Step #4: Paste the code below tag.
Step #5: Save your template and you're done
Tutorial Credit: onesignal.com
That's all for this tutorials. Thanks for dropping by at vbt blog.
Happy Blogging!


