Featured

SEO Rocket Blogger Template

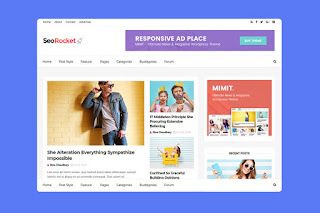
SEO Rocket is a responsive and high-quality blogger template. It is a seo ready and fast loading template, that has fully responsive layout, which fits any screen or device, whether its a desktop, laptop, tablet or smartphone. This theme can be used for almost any kind of blog but it is best suitable for niche blogs, tech, news, blog, magazine, daily blogs, food blogs, authority and best for event blogs. More features for this template below.


    Features: SEO Rocket Blogger Template


    • Seo Ready
    • Responsive Design
    • Ads Ready
    • SEO Optimized
    • Ads Ready
    • Well Documentation
    • Fast Loading
    • Social Bookmark Ready
    • Page Navigation Menu
    • Drop Down Menu


    Screenshot: SEO Rocket Blogger Template


    Information: SEO Rocket Blogger Template


    How to Install Blogger Templates: Click Here
    Template name : SEO Rocket
    Platform: Blogger/Blogspot
    Author :  ThemeXpose

    SEO Rocket Installation Documentation: Click Here

    Download: SEO Rocket Blogger Template


    Demo Click here

    Download Click here
    Learn more »

    How to install Reaction Buttons in Blogger - Complete Guide with Pictures

    How to Add Reaction Buttons in Blogger?

    The most common idea why you want to add reaction button in your site is that Reaction buttons give your visitors a fun, quick way to interact with your content. That is also a big impact on your side knowing whether your visitors like or dislike your content. If you receive more like reactions then better continue what you are doing but if dislike then better change or improve more your content, as simple as that.


    How to install Reaction Buttons in Blogger


    Let us begin with the tutorial, simply follow the steps below:

    Step #1: Create an account at ShareThis.com

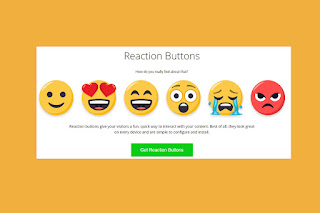
    For this tutorial, We are going to use reaction buttons from sharethis platform. What are sharethis reaction buttons? ShareThis reaction buttons allow your site visitors to react to your content in a single click: Like it. Love it. Wow. LOL. Sad. Angry.

    The beauty of reaction buttons is that they lower the barrier to interaction: Instead of having to comment, share, or choose any other form of interaction, your website visitors can provide instant feedback to any content – photos, blog posts, new site pages, video, etc. – with close to zero effort. And that’s your ticket to more interaction from more people.

    Step #2: After Creating an Account, Log-in and You will be directed to ShareThis APP Directory.

    Step #3: On the Upper Right, Click Drop Down Arrow and Select "Setup New Property.

    How to install Reaction Buttons in Blogger


    Step #4: It will ask you to give the Name of your New Property Domain. Just simply type your blog URL then click "ADD".

    How to install Reaction Buttons in Blogger


    Step #5: Now look for Engagement Tools and Choose Reaction Share Buttons.

    How to install Reaction Buttons in Blogger

    Buttons Configuration:
    • Click a reaction to add or remove it from your buttons
    • Click and drag a reaction to reorder
    • Choose left, center, or right alignment
    • Choose your language

    Step #6: We are going to verify your domain by installing the sharethis.js code into your Blogger template.

    How to install Reaction Buttons in Blogger


    Step #7: Go to your Blogger Dashboard --> Select Theme --> Edit HTML --> Paste the given code after <head>. . Once Done Click Verify.


    Note: If you will encounter problem in saving regarding CMS in the code "product=inline-reaction-buttons&cms=sop" simply replace "&" from your script with "&amp;". Code should be like this:  "product=inline-reaction-buttons&amp;cms=sop".

    Step #8: Copy and Paste the next code where you want to show reaction buttons.

    How to install Reaction Buttons in Blogger


    To Show Reaction Buttons Below Posts:

    If you want to show reaction buttons below your posts then copy below code and paste it above  <div class='post-footer'>  in your theme code.

    <b:if cond='data:blog.pageType == "item"'>
    <div class="sharethis-inline-reaction-buttons"></div>
    </b:if>

    Note: You will find  <div class='post-footer'>  two times in your theme paste the above code above second  <div class='post-footer'>.

    Step #9: Click Save and your done.

    If you want to update your Reaction Buttons simply make all the updates at your Sharethis APP dashboard.

    That's all for this tutorial. Feel free to comment below if you have any questions or suggestions.  If you like this post kindly share and even share us a beer!

    Happy Blogging!
    Learn more »

    How to Add Youtube Subscribe Button in Blogger

    Youtube is the most famous video sharing website nowadays. If you have your Youtube Channel and you want to increase your subscribers then this tutorial will give the idea on how to Add Youtube Subscribe Button in your Blogger site.

    How to Add Youtube Subscribe Button in Blogger

    Demo: Click and Subscribe!


    How to Add Youtube Subscribe Button in Blogger?

    Let us begin with the tutorial, simply follow the steps below:

    Step #1: Go to Youtube Developer's Page

    The tool below lets you configure an embedded subscription button. You can set the button's display options, preview the button, and copy the code needed to insert that button on your page.You can see the preview of the button below the options.

    How to Add Youtube Subscribe Button in Blogger
    Step #2: After you fill the required data, scroll down and copy the generated code.

    How to Add Youtube Subscribe Button in Blogger

    Step #3: Log in to your Blogger Account and Go to your Blogger Dashboard.


    Step #4: Click Layout --> Add gadget --> Choose HTML/Javascript.
    Step #5: Copy and Paste Youtube generated subscribe button code into it.

    Step #6: Click Save and your done.

    You can arrange wherever you want to put your Subscribe button.

    That's all for this tutorial. Feel free to comment below if you have any questions or suggestions.  If you like this post kindly share and even share us a beer! Thanks Happy Blogging!
    Learn more »

    Moviez Blogger Template

    Moviez Blogger Template is responsive and high-quality and designed for movie promotion, presentation of projects, films, images, events and much more. Perfect choice for your magazine site, news online, editorial, personal blog magazine, entertainment (movie and music) or any type of creative blog or simple magazine. More features for this template below.


      Features: Moviez Blogger Template


      • Seo Ready
      • Responsive Design
      • Ads Ready
      • SEO Optimized
      • Ads Ready
      • Breadcrumb Navigation Ready
      • Fast Loading
      • Social Bookmark Ready
      • Post Thumbnails
      • Drop Down Menu


      Screenshot: Moviez Blogger Template


      Information: Moviez Blogger Template


      How to Install Blogger Templates: Click Here
      Template name : Moviez
      Platform: Blogger/Blogspot
      Author :  SoraTemplates

      Download: Moviez Blogger Template


      Demo Click here

      Download Click here
      Learn more »

      Movie Mag Blogger Template

      Movie Mag Blogger Template is a responsive and high-quality blogger template best for Movie or video enthusiast. Some of its best features are, it comes with a separate framework that is built with latest technologies like CSS3 and HTML5. Movie Mag has banner areas, so it allows you to show ads and earn money without making damage to your website overall look. More features for this template below.


        Features: Movie Mag Blogger Template


        • Seo Ready
        • Responsive Design
        • Ads Ready
        • SEO Optimized
        • Ads Ready
        • Browser Compatibility
        • Supports Video
        • Social Buttons
        • Slider
        • 4 Columns Footer


        Screenshot: Movie Mag Blogger Template


        Information: Movie Mag Blogger Template


        How to Install Blogger Templates: Click Here
        Template name : Movie Mag
        Platform: Blogger/Blogspot
        Author :  SoraTemplates

        Download: Movie Mag Blogger Template


        Learn more »

        Moview Blogger Template

        Moview Blogger Template is a responsive and high-quality template for video/moview enthusiast. Not only yu can use templates for movie download blog, Moview blogger template is also perfect for Book review website or Book download blog as well. More features for this template below.


          Features: Moview Blogger Template


          • Mobile Friendly
          • Responsive Design
          • Ads Ready
          • SEO Optimized
          • Ads Ready
          • Easy Admin Panel
          • Fast Loading
          • Unlimited home layout box
          • Page Navigation Menu
          • Social Share Buttons


          Screenshot: Moview Blogger Template


          Information: Moview Blogger Template


          How to Install Blogger Templates: Click Here
          Template name : Moview
          Platform: Blogger/Blogspot
          Created by :  Template Mark

          Download: Moview Blogger Template


          Demo Click here

          Download Click here
          Learn more »

          Sora Viral Blogger Template

          Sora Viral Blogger Template

          Sora Viral Blogger Template is a responsive and high-quality best for video or photography. This theme comes with various widgets that support natively and you don’t have to bother yourself adding any. It is a highly optimized theme that will boost your traffic and earnings both. The most unique feature is a dark and light mode switcher that lets your users select a dark and light background so that it won’t hurt their eyes while reading any viral article.


            Features: Sora Viral Blogger Template


            • Seo Ready
            • Responsive Design
            • Ads Ready
            • SEO Optimized
            • Ads Ready
            • Adapted From WordPress
            • Fast Loading
            • Social Bookmark Ready
            • Page Navigation Menu
            • Drop Down Menu


            Screenshot: Sora Viral Blogger Template


            Information: Sora Viral Blogger Template


            How to Install Blogger Templates: Click Here
            Template name : Sora Viral
            Platform: Blogger/Blogspot
            Author :  SoraTemplates

            Download: Sora Viral Blogger Template


            Demo Click here

            Download Click here
            Learn more »

            Download Hub Blogger Template

            Free Download Hub Blogger Template

            Download Hub Blogger Template is a very unique and one of a kind blogging blogger theme for creating movie downloading site on blogger. This is a highly SEO optimized theme with an updated schema markup feature, it passes every google webmaster tool test without parsing any error in console or webmaster tool. This is a highly SEO optimized theme with an updated schema markup feature, it passes every google webmaster tool test without parsing any error in console or webmaster tool. More features for this template below.


              Features: Download Hub Blogger Template


              • Seo Ready
              • Responsive Design
              • Ads Ready
              • SEO Optimized
              • Ads Ready
              • Tabbed Widget Ready
              • Fast Loading
              • Social Bookmark Ready
              • Page Navigation Menu
              • Drop Down Menu


              Screenshot: Download Hub Blogger Template


              Information: Download Hub Blogger Template


              How to Install Blogger Templates: Click Here
              Template name : Download Hub
              Platform: Blogger/Blogspot
              Author :  SoraTemplates

              Download: Download Hub Blogger Template


              Learn more »

              How to add CSS3 Animated DOWNLOAD/DEMO button for Blogger

              If your sharing download/demo in your blog, then you must use a fancy button to attract your visitors. This tutorial will give you the option to add fancy button. This button is purely CSS3 so it is easy for you to integrate in your blogger template. You can refer below for the demo button.

              How to add CSS3 Animated DOWNLOAD/DEMO button for Blogger


              Adding the CSS in the Template

              Let us begin with the tutorial, simply follow the steps below:

              Step #1: Log in to your Blogger Account and Go to your Blogger Dashboard.

              Step #2: Click Theme --> Edit HTML.

              Step #3: Find </body> by Pressing CTRL + F (Windows) or CMD + F (MAC)

              Step #4: Now paste the below code above/before </body> tag.

              <style> .abt-button { margin: 50px auto; width: 200px; } /* Get this button at vblogger-templates.blogspot.com */ .abt-button a { background: -moz-linear-gradient(center top , #00B7EA 0%, #009EC3 100%) repeat scroll 0 0 transparent; color: white; display: block; font: 17px/50px Helvetica,Verdana,sans-serif; height: 50px; text-align: center; text-decoration: none; text-transform: uppercase; width: 200px; position: relative; z-index: 2; /*TYPE*/ color: white; font: 17px/50px Helvetica, Verdana, sans-serif; text-decoration: none; text-align: center; text-transform: uppercase; /*GRADIENT*/ background: #00b7ea; /* Old browsers */ background: -moz-linear-gradient(top, #00b7ea 0%, #009ec3 100%); /* FF3.6+ */ background: -webkit-gradient(linear, left top, left bottom, color-stop(0%,#00b7ea), color-stop(100%,#009ec3)); /* Chrome,Safari4+ */ background: -webkit-linear-gradient(top, #00b7ea 0%,#009ec3 100%); /* Chrome10+,Safari5.1+ */ background: -o-linear-gradient(top, #00b7ea 0%,#009ec3 100%); /* Opera 11.10+ */ background: -ms-linear-gradient(top, #00b7ea 0%,#009ec3 100%); /* IE10+ */ background: linear-gradient(top, #00b7ea 0%,#009ec3 100%); /* W3C */ filter: progid:DXImageTransform.Microsoft.gradient( startColorstr=&#39;#00b7ea&#39;, endColorstr=&#39;#009ec3&#39;,GradientType=0 ); /* IE6-9 */ } .abt-button a, .abt-button p { -webkit-border-radius: 10px; -moz-border-radius: 10px; border-radius: 10px; -webkit-box-shadow: 2px 2px 8px rgba(0,0,0,0.2); -moz-box-shadow: 2px 2px 8px rgba(0,0,0,0.2); box-shadow: 2px 2px 8px rgba(0,0,0,0.2); } .abt-button p { background: #222222; color: #FFFFFF; display: block; font: 12px/45px Helvetica,Verdana,sans-serif; height: 40px; margin: -40px 0 0 10px; position: absolute; text-align: center; transition: margin 0.5s ease 0s; width: 180px; z-index: 1; /*TRANSITION*/ -webkit-transition: margin 0.5s ease; -moz-transition: margin 0.5s ease; -o-transition: margin 0.5s ease; -ms-transition: margin 0.5s ease; transition: margin 0.5s ease; } .abt-button:hover .up { margin: -5px 0 0 10px !important; } .abt-button:hover .down { line-height: 35px !important; margin: -85px 0 0 10px !important; } .abt-button a:active { background: #00b7ea; /* Old browsers */ background: -moz-linear-gradient(top, #00b7ea 36%, #009ec3 100%); /* FF3.6+ */ background: -webkit-gradient(linear, left top, left bottom, color-stop(36%,#00b7ea), color-stop(100%,#009ec3)); /* Chrome,Safari4+ */ background: -webkit-linear-gradient(top, #00b7ea 36%,#009ec3 100%); /* Chrome10+,Safari5.1+ */ background: -o-linear-gradient(top, #00b7ea 36%,#009ec3 100%); /* Opera 11.10+ */ background: -ms-linear-gradient(top, #00b7ea 36%,#009ec3 100%); /* IE10+ */ background: linear-gradient(top, #00b7ea 36%,#009ec3 100%); /* W3C */ filter: progid:DXImageTransform.Microsoft.gradient( startColorstr=&#39;#00b7ea&#39;, endColorstr=&#39;#009ec3&#39;,GradientType=0 ); /* IE6-9 */ } .abt-button:active .up { margin: -20px 0 0 10px !important; } .abt-button:active .down { margin: -70px 0 0 10px !important; } </style>

              Step #5: Click Save Template and your done.

              Adding the Button

              In adding the button in your post simply switch the post editor to HTML from Compose and add the below HTML.

              div class="abt-button"> <a href="#">Download</a> <p class="up">click to begin</p> <p class="down">5MB size</p> </div>

              Note: Simply change the words with red color of your own.

              That's all for this tutorial. Feel free to comment below if you have any questions or suggestions.  If you like this post kindly share and even share us a beer! Thanks Happy Blogging!

              Learn more »

              How to install Push Notification in Blogger using OneSignal Platform

              Why use Push Notification in your site? Use push notification to message your users when they might need a reminder about something. People find great value in receiving push notifications that alert them of updates or the latest news from your blog.

              One of the best and reliable platform for push notification is OneSignal. OneSignal is a reliable service to send push notifications, in-app messages, and emails to your users on mobile and web, including content management platforms like blogger, Wordpress and Shopify.

              What is the advantage in using OneSignal? In OneSignal documentation you can discover resources and training to implement OneSignal’s SDKs, learn how to leverage OneSignal’s powerful API, and find best practices for sending messages to increase your user engagement. In short OneSignal is user friendly and easy to integrate to your website or blog.

              Install Push Notification in Blogger using OneSignal Platform


              Now let us proceed with the tutorial on how to setup OneSignal in blogger site. Simply follow the instructions and you will not get lost. If you have any questions feel free to comment below.

              How to set up OneSignal Web Push notifications on Blogger sites

              Configuring Notification at OneSignal.

              Step #1: Create an account at OneSignal.Com > Proceed to Create New App/Website.

              Install Push Notification in Blogger using OneSignal Platform
              Step #2: Fill-up the name of your app or website > Select Web Push > Click Configure your platform

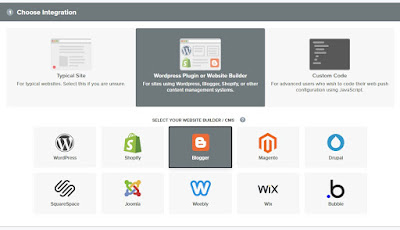
              Step #3: Choose Integration


              Install Push Notification in Blogger using OneSignal Platform

              Note: OneSignal supports sending web push notifications from a variety of different web technologies. Select Blogger to continue

              Step #4: Blogger Site Setup

              Once you've selected Blogger as your integration, you must fill out information about your site.
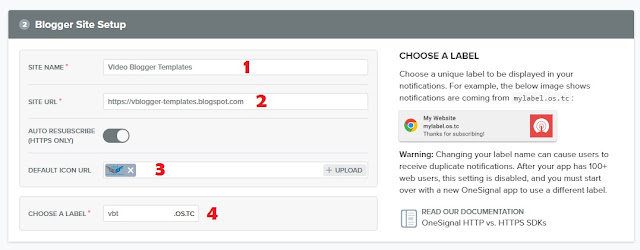
              Install Push Notification in Blogger using OneSignal Platform

              Choose a Label

              Blogger implementations must choose a unique label to be displayed in your notifications. For example, the above image shows notifications are coming from vbt.os.tc. I use vbt as my label.

              Note: You can only change your label if you have less than 100 web users. Once you have 100+ web users, this setting is disabled.

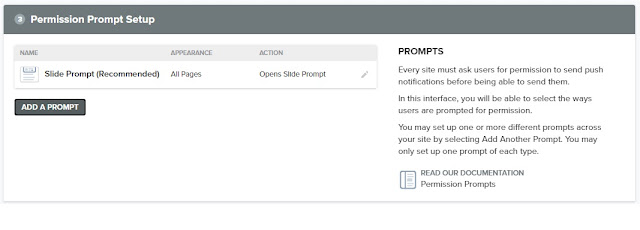
              Step #5: Permission Prompt Setup


              Install Push Notification in Blogger using OneSignal Platform
              To send push notifications to users, you first must ask them for permission using a Prompt. You must have at least one Prompt on your site for web push to work. Click Add a Prompt to open the permission prompt selector.

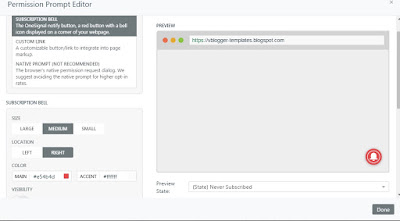
              Permission Prompt Editor


              Install Push Notification in Blogger using OneSignal Platform

              In the Permission Prompt Editor, you can select which prompts you wish to use, and style them as you like. Once you have edited the prompt to your liking, click Save.

              The following Options can be see at the Permission Prompt Editor:

              Subscription Bell - a small icon at the corner of your page that users can interact with to subscribe

              Slide Prompt - a small modal that comes from the center of the page and asks if users are interested in signing up.

              HTTP Pop-Up Prompt (HTTP-only) - a pop-up window that appears after other prompts that is required for HTTP sites.

              Custom Prompts - create your own links or buttons as prompts.

              Step #6: Welcome Notification


              Install Push Notification in Blogger using OneSignal Platform

              Optional


              Welcome notifications an optional way to thank users after subscribing to your site. Users will see a welcome notification as soon as they subscribe. You can edit or disable them here.

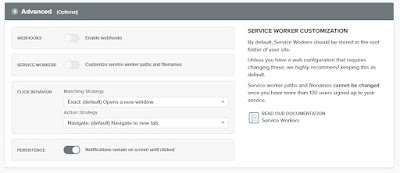
              Step #7: Advanced Options


              Install Push Notification in Blogger using OneSignal Platform

              Optional

              Most sites will not have to edit anything in Advanced options.

              Step #8: Once you've completed steps 3-7, click 'Save' to save your configuration.

              To enable OneSignal on your Blogger site, you will need to copy the code from Web Push Settings.


              Install Push Notification in Blogger using OneSignal Platform


              Adding Code to Blogger Site

              Just simply follow the steps below:

              Step #1: Log in to your Blogger Account and Go to your Blogger Dashboard

              Step #2: Click ->Template -> Edit HTML Note: Backup your Template

              Step #3: Find  by Pressing CTRL + F (Windows) or CMD + F (MAC)

              Step #4: Paste the code below   tag.

              Install Push Notification in Blogger using OneSignal Platform


              Step #5: Save your template and you're done

              Tutorial Credit: onesignal.com

              That's all for this tutorials. Thanks for dropping by at vbt blog.

              Happy Blogging!
              Learn more »