Featured

Ways to Embed Youtube Video in Blogger/Blogspot Posts

Introduction:

Adding pictures to your post will make your content more encouraging to visitors reading your blog. It actually add life to the content. However, adding videos to your content makes it more interesting for your visitors to read your blog. Readers today, they are having fun of reading but at the same they want to see it live. The idea there is when your writing a blog post as much as possible it is supported by proved and adding video is one of the best method to do it.
Ways to Embed Youtube Video in Blogger Posts

This blog (vblogger-templates.blogspot.com) provides you with free Video Blogger Templates that you can use to start video blogging. But in terms of adding Youtube videos in your post, this tutorial is the best way to guide you on how easily you can Embed Youtube video in Blogger Post.


    There are several ways of adding YouTube videos in blogger, but we will try to discuss all possible ways so you can decide which one suits you the most.


    Method #1: Add YouTube Videos using Embed Code


    One of the most used method to add YouTube videos in your blog posts is by using embed code.

    1. 1. Firstly go to YouTube.com and open any video that you would like to embed. 
    2. 2. Now, click on the SHARE icon
      Ways to Embed Youtube Video in Blogger Posts

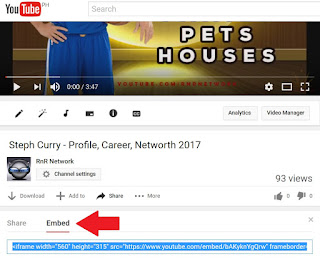
    3. 3. New window options appear below, Since we want to get the embedded code of the video, select “Embed” from the tab menu and copy the entire code as you can see in the screenshot below: 
      Ways to Embed Youtube Video in Blogger Posts

    4. 4. After copying the YouTube video embed code, go to Blogger >> Add New Post >> Select HTML tab >> paste the embed code in the HTML Editor.

      Ways to embed Youtube video in Blogger Posts
    5. 5. You can change the width or height based on your needs. Once you are happy with your video, press the publish button.

    Method #2: Add YouTube Videos using Share Button

    YouTube allows you to directly share their videos on your Blogger blogs through their “Share to Blogger” feature that is provided to every video that is uploaded on blogger.

    1. 1. To directly share YouTube videos to your Blogger site, go to YouTube.com and open up any video that you like.
    2. 2. Now, click on the SHARE icon. 
    3. Ways to Embed Youtube video in Blogger Posts

      1. 3. You will now notice a bunch of social networking sites that you can choose to share the video. Since you want to share this video to your Blogger site, click on “Blogger icon” as you can see in the screenshot below:

      2. 4. After clicking on Blogger Icon, a new window will pop out. From the list of your blogs, select which blog you want to share this video and press the “Publish post” button.
      Ways to add Youtube video in Blogger Posts


      Method #3: Add YouTube Videos using “Insert a Video” option in Blogger


      Probably the easiest way to add YouTube videos in blogger is to use the built-in “Insert a Video” feature that is provided in blogger post editor.
      1. 1. Go to Blogger >> Add a New Post and Click on the “Insert a Video” icon.
        Ways to Embed youtube video in blogger posts

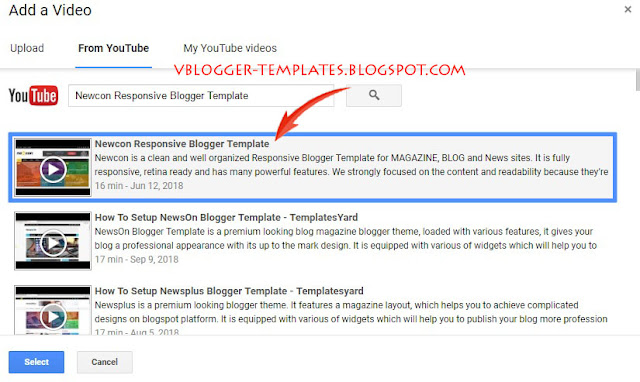
      2. 2. Since we want to add a video from YouTube, select “From YouTube” from the list of multiply options that you can use to insert videos into your blog posts.
        Ways to Embed youtube video in blogger posts

      3. 3. In the search box, type a title of the video or search for any video. Once searching is complete, click on the video thumbnail and press the “Select” button to add it in your blog post.
        Ways to Embed youtube video in blogger posts

      4. 4. Once you’re satisfied, press Publish button.

      That's it. We hope that this tutorial can guide you all the way in Embedding Youtube video in your blog. If you like this tutorial please share and like us on Facebook and Twitter.
      Learn more »

      How to Embed VIMEO videos in Blogger?

      Introduction:

      How to Embed VIMEO videos in Blogger?

      Since this blog focuses on video blogging, this tutorial will show how to embed VIMEO video in blogger. What is Vimeo? Vimeo is an ad-free open video platform that is headquartered in New York City. The company provides creators with tools and technology to host, distribute and monetize videos. (Wikipedia)


      Sample:


      Embedding Video:

      This is a straightforward process.

      1. You go into your Vimeo account or Vimeo Website and choose the video you want to embed. Then you will see a black rounded icon with a paper airplane: Click that button.

      How to Embed VIMEO videos in Blogger?

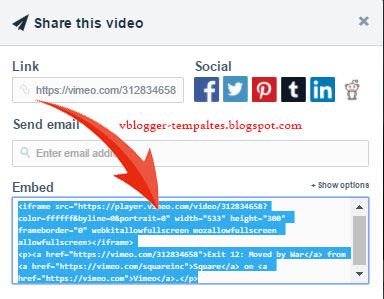
      2. A dialog box appears with share and embedding options. Since we want to embed the video, we are only interested in the Embed options. At the bottom right, click Show options:

      How to Embed VIMEO videos in Blogger?


      3. The panel enlarges after clicking on the link. Scroll down a little until you see the options just below your video:

      How to Embed VIMEO videos in Blogger?


      Setting Up VIMEO Video:

      You can test various options which show in realtime on your video.

      How to Embed VIMEO videos in Blogger?

      Size:
      Generally, you will want to set the Fixed Size according to the width of your page or You can select Responsive, wherein your video size will automatically adjust on your page. When you change a value in either the width or height, the related value changes in relation with the dimensions (aspect ratio) of your video.

      Color:
      You can change the Color as well. This influences the color of the Text on top of the video. This way, you can adapt the color to match your site. Select a predefined color (little boxes) or use the color selector to create a custom color

      Intro:
      The Intro has 3 options: Portrait (which is your Vimeo avatar), Title (of the video) and Byline (author name).

      Special Stuff:
      Special stuff determines the behavior of the video player. This is quite self-explanatory: For instance, if you want the video to start playing automatically upon page load, tick the Autoplay this video box.

      4. When you are done, you can select the embedding code:

      How to Embed VIMEO videos in Blogger?

      Vimeo again makes it easy for us, when you click in the box, the code is selected automatically.


      5. Now go to your site:
      • - Select the page or post where you want to embed the video 
      • - In the html mode of the page, place the cursor at the spot where you want to show the video 
      • - Press CTRL+V (paste for Windows) or Command+C(paste for MacOs) to paste the code into the page.

      That's it. You now successfully embed VIMEO video on your Blog. 

      Goodluck! and Happy Vlogging everyone. 
      Learn more »

      How to Add Logo to Blogger Header

      Introduction

      In this tutorial,you are going to learn the basic thing on how to add a logo to Blogger Header.

      How to Add Logo to Blogger Header

      Logo is one of the important aspect that you need to consider when making a blog or website. Simply because a logo is the visual representation of your blog or website. Actually based from your logo visitors would already identify the type of blog or website you have.

      Adding logo to your site header is very simple. Just simply follow the steps below.


      How to Add Logo to Blogger header.

      Steps to follow:

      1. On your Dashboard, Click on "Edit" link of your header widget.

      How to Add Logo to Blogger Header

      Note: a new window will open.

      2. There are 2 ways to add your header logo image.

      A. From your computer - using this option you can upload a logo image from your hard disk.

      B. From the web - using this option you can give logo image URL to the input field has given. (If you already have uploaded it to somewhere)

      I recommend to continue with "From your computer" option, because uploading your logo to blogger, it will load fast.

      How to Add Logo to Blogger Header

      Select "Instead of title and description" as the "Placement" option.

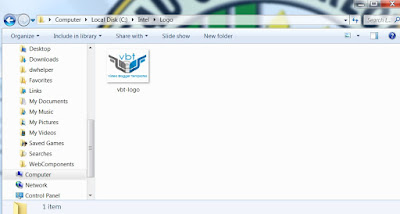
      3. Select logo image from your hard drive.


      4. When upload complete, Save Header widget and refresh your site to see result. 


      Final results will be similar to below:

      How to Add Logo to Blogger Header


      Thats all, Thank you and  Happy Blogging!
      Learn more »

      Embedding Youtube Videos in Video Blogger Templates with Auto Thumbnail Display


      Introduction

      What I shared here on my blog are mostly Video Blogger Templates. If your fun of vlogging, sharing your personal videos or doing some movie reviews then Video Blogger Templates is what you need.

      In using Video Blogger Templates, the most important thing to know is how to embed your videos on your post. One of the most famous video sharing site, of course, is Youtube.

      For Youtube, the most basic thing to embed videos in simply copy the embed code below of any Youtube videos you want.

      Example:

      Below is an example of Youtube embed code
      <iframe width="560" height="315" src="https://www.youtube.com/embed/ bAKyknYgQrw" frameborder="0" allowfullscreen></iframe>

      Explaining Auto Thumbnail

      Notice the embed code given above, it's a simple iframe when you use it on your blogger post, Yes it will definitely give your audience a playable video. But what was lacking is when using that code in your Video Blogger Templates, this will not provide you an AUTOMATIC THUMBNAIL giving you a "NO IMAGE OR NO PREVIEW" seeing on your homepage. Alternatively is you need to add an image in your post that will extract as a thumbnail.


      Youtube Thumbnail

      I had mentioned above that adding image in your blogger post will extract the thumbnail, that will show on your homepage instead of seeing "NO IMAGE".

      Now what we need to understand is how to extract Thumbnails from a Youtube video. There are actually four (4) thumbnails available through Youtube API for each video.

      This is the URL structure of Youtube Thumbnail.
      http://img.youtube.com/vi/VIDEO ID/IMAGE NUMBER.jpg
      Note that each Youtube video thumbnail has its unique ID represented by VIDEO ID and an IMAGE NUMBER.

      VIDEO ID   

      For Video ID: Video URL below found here: Youtube Channel
      https://www.youtube.com/watch?v=bAKyknYgQrw
      Where bAKyknYgQrw is the VIDEO ID.

      IMAGE NUMBER

      YouTube Data API stores around 4 thumbnails for each video. Three (3) small and one (1) large. The thumbnails stored for the above video are located at, see example below:

      First:
      http://img.youtube.com/vi/bAKyknYgQrw/0.jpg
      1st largest Full size Default thumbnail Image with zero (0) IMAGE NUMBER.

      Youtube Thumbnail

      Second:
      http://img.youtube.com/vi/bAKyknYgQrw/1.jpg
      2nd Small thumbnail Image with One (1) IMAGE NUMBER.

      Youtube Thumbnail


      Third:
      http://img.youtube.com/vi/bAKyknYgQrw/2.jpg
      3rd Small default thumbnail Image with Two (2) IMAGE NUMBER.

      Youtube Thumbnail


      Fourth:
      http://img.youtube.com/vi/bAKyknYgQrw/3.jpg
      4th Small thumbnail Image with Three (3) IMAGE NUMBER.

      Youtube Thumbnail

      Embedding Thumbnail on Blog Post

      In embedding Thumbnail on you Blogger Posts, supposed let say your question is, aside from the given 4 number of image thumbnails from Youtube API can I add a custom size for my Thumbnail?


      The answer is YES. Simply add the width of your liking.

      See example below:
      <img src=http://img.youtube.com/vi/VIDEO ID/0.jpg  width="300px"/>
      Again VIDEO ID is the ID of your YouTube video URL and change the width depends already on your own choice.

      Preview for custom 300px IMAGE size.


      So that's it. Using and understanding how to extract Youtube thumbnail will give you now an idea on how to embed Youtube videos that will extract an auto thumbnail for your Video Blogger Templates.

      Watch out for my next Tutorial. I will be writing about how to embed Youtube Videos responsively without anymore using the Standard "iframe" Youtube embed code.

      Have a nice day everyone!
      Learn more »

      How to install Blogger template

      Introduction: 

      Installing blogger templates on your blog is very easy. There are actually two ways to install, the first one is by uploading the actual XML format of blogger template and the second one is Copy and Paste coding. Completely replaced all coding.

      In this tutorial where are going to do the uploading of XML. Take note that in Blogger the template is in XML format.

      Ofcourse one thing that you need to prepare before installing Blogger templates is your downloaded blogger template. If your fun on video blogger templates then go ahead and head over to the homepage of this blog and look for the video template that sooths your taste of blog. If you want to use other template then just google it and there's a lot of website that offers free blogger templates.

      Let say you have downloaded your template and with the XML on it. We are going with the installation of templates.


      Step 1: Logged in your Blogger Dashboard. 

      You must logged in your google account to access your blogger dashboard (Ignore this step if you are already logged in)


      Step 2: Access Theme Section.

      If you have multiple blogs, Just simply choose the Blog that you want to change the template and click “Theme” in the option panel on the left.


      Step 3: Access Backup / Restore.

      At the top right corner, you will see “Backup / Restore” button and go ahead click it on. 
      Note: Before anything goes wrong, So that you can RESTORE the previous template always do a "BACKUP". Backup means simply download your old template before installing new one. 


      Step 4: Get ready to upload. 

      Manage on pop-up windows and click “choose file” button and look for folder that is created after extracted file that you have downloaded.


      Step 5: Select .xml file for uploading.


      Look for the downloaded XML file in the folder where you copy/extract/save  your blogger template.


      Step 6: Start uploading template.

      Click “Upload” button. Now uploading process appear in your screen.


      A message will appear stating "Uploaded Successfully". Now the template will appear in your blog.


      That's all. Goodluck!
      Learn more »